Wrapper Program Oracle Apps
A wrapper is just that - a wrapper that wraps an interface into something easier and friendlier and more flexible to use. For example, instead of calling RAISEAPPLICATIONERROR directly, a wrapper procedure can be created to wrap this. This wrapper is then called instead of RAISEAPPLICATIONERROR. With more than 10 years of experience in Oracle Apps. I have worked in both service & product based companies. Having worked on all Financial, SCM & CRM modules along with EPM (Hyperion) cloud. On technical side, I have worked on OAF, D2K forms, XML reports etc. View my complete profile.
OracleAS Adapter for Oracle Applications use Application programming interfaces (APIs) to insert and update data into Oracle Applications.
This chapter contains the following sections:
Overview of APIs
OracleAS Adapter for Oracle Applications use APIs to insert and update data in Oracle Applications. APIs are stored procedures that enable you to insert and update data in Oracle Applications. For example, by using APIs, you can insert a customer record in Oracle Applications.
Design-Time Steps
This section describes how to configure the OracleAS Adapter for Oracle Applications to use APIs. It includes the following topics:
Prerequisites to Configure APIs
OracleAS adapter for Oracle Applications is deployed using the BPEL Process Manager (PM) in Oracle JDeveloper. The BPEL PM creates the WSDL interfaces for the API.
You need to populate certain variables in the BPEL PM in order to provide context information for Oracle Applications. The context information required for an API transaction includes the username and responsibility of an Oracle Applications user that has sufficient privileges to run the program. The default value passed for the username is SYSADMIN. The default value passed for responsibility is SYSTEM ADMINISTRATOR.
You can change the default values specified in the generated WSDL for the username and responsibility. This is a static way of changing the context information. These values would apply to all invocations of the deployed business process. However, if you need to provide different context information for different invocations of the business process, then you can dynamically populate the header variable with values for username and responsibility. The context information can be specified by configuring an Assign activity before the Invoke activity in the BPEL PM.
Configuring OracleAS Adapter for Oracle Applications
This section describes the tasks required to configure OracleAS Adapter for Oracle Applications using the Adapter Configuration Wizard in Oracle JDeveloper. It contains the following topics:
Creating a New BPEL Project
The first configuration task is to create a new BPEL project. This section describes how to create a new BPEL project.
To create a new BPEL project:
Open BPEL Designer.
From the File menu, select New. The New Gallery dialog box is displayed.
Select All Items from the Filter By list. This displays a list of available categories.
Expand the General node, and then select Projects.
Select BPEL Process Project from the Items list, as shown in Figure 3-1.
Figure 3-1 Creating a New BPEL Process Project
Description of 'Figure 3-1 Creating a New BPEL Process Project'Click OK. The BPEL Process Project dialog box is displayed.
In the BPEL Process Name field, enter a descriptive name. For example,
InsertShipNotice.From the Template list, select Empty BPEL Process. Keep the default selection for Use Default in the Project Content section, as shown in Figure 3-2.
Figure 3-2 Specifying a Name for the New BPEL Process Project
Description of 'Figure 3-2 Specifying a Name for the New BPEL Process Project'Click OK. An empty BPEL process, with the necessary source files including
bpel.xml,InsertShipNotice.xml, andInsertShipNotice.wsdlis created. Figure 3-3 shows the new BPEL process.Figure 3-3 New BPEL Process
Description of 'Figure 3-3 New BPEL Process'
Adding a New Partner Link
The next task is to add a partner link to the BPEL process. This section describes how to create an OracleAS adapter for the application service by adding a partner link to your BPEL process. A BPEL partner link defines the link name, type, and the role of the BPEL process that interacts with the partner service.
To add a partner link:
Drag and drop PartnerLink into the border area of the process diagram. The Create Partner Link dialog box is displayed.
Click Define Adapter Service in the WSDL Settings section. The Adapter Configuration Wizard is displayed.
Click Next. The Adapter Type dialog box is displayed.
Select Oracle Applications to specify the adapter you want to configure, as shown in Figure 3-4.
Figure 3-4 Selecting OracleAS Adapter for Oracle Applications
Description of 'Figure 3-4 Selecting OracleAS Adapter for Oracle Applications'Click Next. The Service Name dialog box is displayed.
Enter the following information:
In the Service Name field, enter a service name.
In the Description field, enter a description for the service. This is an optional field. The Service Name dialog box is displayed, as shown in Figure 3-5.
Figure 3-5 Specifying the Service Name and Description
Description of 'Figure 3-5 Specifying the Service Name and Description'
Click Next. The Service Connection dialog box is displayed.
Enter the JNDI (Java Naming and Directory Interface) name in the Database Server JNDI Name field. The JNDI name acts as a placeholder for the connection used when your service is deployed to the BPEL server. This enables you to use different databases for development and later for production.
See Also:
Oracle Application Server Adapter Concepts for understanding JNDI concepts.Click New to define a database connection. The Create Database Connection Wizard is displayed.
Note:
You need to connect to the database where Oracle Applications is running.
Click Next. The Authentication dialog box is displayed.
Enter the following information:
In the UserName field, specify a unique name for the database connection.
In the Password field, specify a password for the database connection.
Click Next. The Connection dialog box is displayed.
Enter the following information:
From the Driver list, select Thin.
In the Host Name field, specify the host name for the database connection.
In the JDBC Port field, specify the port number for the database connection.
In the SID field, specify the unique SID value for the database connection.
The Connection dialog box is displayed, as shown in Figure 3-8.
Miracle Box Latest Setup v3.04 (2020) Latest Version Free Download. Updated: January 25, 2020. Download and install Miracle box latest setup on your Windows PC. Flashing of a mobile phone would be breathtaking for you, especially for the beginners who do not know even now the basics of flashing of the mobile phone. The reason why do you need to. Download Miracle Box for Windows PC from FileHorse. 100% Safe and Secure Free Download (32-bit/64-bit) Latest Version 2020. Download miracle box crack setup latest version.
Figure 3-8 Specifying Connection Details for the New Database
Description of 'Figure 3-8 Specifying Connection Details for the New Database'
Click Next. The Test dialog box is displayed.
Click Test Connection to determine whether the specified information establishes a connection with the database.
Click Next. The Service Connection dialog box is displayed, providing a summary of your database connection.
Click Finish to complete the process of creating a new database connection.
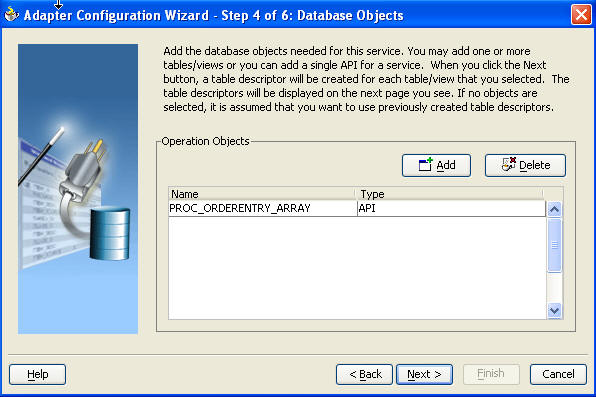
Once you have completed creating a new connection for the service, you can add an API by browsing through the list of APIs available in Oracle Applications.

Click Next. The Application Interface dialog box is displayed, as shown in Figure 3-9.
Note: If you are connecting to a pre-11.5.10 Oracle Applications instance, then you would be required to select the interface to Oracle Applications data. Select Tables/Views/APIs/Concurrent Programs to proceed. |
Click Get Object to open the Oracle Applications Module Browser. Figure 3-10 shows the Oracle Applications Module Browser.
Figure 3-10 Specifying the API
Description of 'Figure 3-10 Specifying the API'
Oracle Applications Module Browser includes the various product families that are available in Oracle Applications. For example, the Marketing Suite or the Order Management Suite are product families in Oracle Applications. The product families contain the individual products. For example, the Order Management Suite contains the Shipping Execution Common product. The product contains the business entities associated with the product. For example, the Shipping Execution Common product contains the Delivery entity. Business entities contain the various application modules that are exposed for integration. These modules are grouped according to the interface they provide. APIs can be found under the PLSQL category.
Note: In the 11.5.10 instance the Module Browser displays only the public APIs that are exposed to the integration repository. Whereas, in the pre-11.5.10 instance the Module Browser displays all the APIs that are available in the package. |
Click Next, and then click Finish to complete the process of configuring OracleAS Adapter for Oracle Applications. The wizard generates the WSDL file corresponding to the XML schema. This WSDL file is now available for the partner link.
Click OK. The partner link is created with the required WSDL settings.
After adding and configuring the partner link, the next task is to configure the BPEL process.
Describing Wrapper APIs
The Adapter Configuration wizard generates a wrapper API when an API has arguments the data types of which are: PL/SQL Boolean, PL/SQL Table, or PL/SQL Record. For generating the wrapper API, Oracle JPublisher is automatically invoked in the background. When a wrapper API is created, besides the WSDL and XSD files, two SQL files are created: one for creating the wrapper API, and necessary datatypes and another for deleting it. The two SQL files are saved in the same directory where the WSDL and XSD files are stored, and are available in the Project view.
The following is a sample code of an API that would require a wrapper to be generated:
If the preceding API is selected in the wizard, then a wrapper API will be created, and loaded into the database. This wrapper API will be used instead of the originally selected API. For this reason, the content of the WSDL and XSD files represent the wrapper procedure, not the procedure originally selected.
The following are the types that will be created for the wrapper API:
Object type for PL/SQL RECORD
Nested table of the given type for PL/SQL TABLE. For example, the nested table of NUMBER.
INTEGER substituted for PL/SQL BOOLEAN
The generated SQL file that creates the wrapper API also creates the required schema objects. The types of the wrapper APIs parameters will be that of the new schema object types. The wrapper package will contain conversion APIs to convert between the base PL/SQL type and the new schema object types.
Note: TheSQLJUTL package contains the BOOL2INT and INT2BOOL conversion functions used for PL/SQL BOOLEAN arguments whose data types have been changed to INTEGER. |
Note: The package name for the wrapper has a limit of 30 characters, and the wrapper API name has a limit of 29 characters. Thus, if the package name and the wrapper API names are longer than the maximum limit, then they will be truncated accordingly. |
Note: TheREF CURSOR type is not supported out of the box. However, for detailed steps to generate an adapter service for an API which takes REF CURSOR type, refer to: http://otndnld.oracle.co.jp/document/products/as10g/1012/doc_v3/integrate.1012/B14448-01/html/adptr_db.htm . Refer to Support for REF CURSOR under Advance Topics.Overloaded APIs are not supported in the 11.5.10 instance. |
Describing Parameters With DEFAULT Clause
You can declare parameters of a stored procedure with a default clause, that when, in the absence of the parameter from the invocation of the procedure, will supply a default value for that parameter. For example:
This procedure can be invoked in the following two different ways:
You can omit elements for parameters with default values in the instance XML. The procedure will be invoked without these parameters, allowing their default values to be used, as shown in the following example:
The element in the XSD for parameters with a default clause is annotated with a special tag to indicate that the parameter has a default clause, as shown in the following example.
This new functionality allows elements for parameters without a default clause also to be omitted in the instance XML. In these cases, the parameter is still included in the invocation of the stored procedure. A value of NULL is bound by default. The following is an example, where the country parameter did not have a default clause:
In prior release, BPEL PM 10.1.2, elements for both parameters were required in the instance XML. If an element was omitted, then it was presumed to have a default clause so the parameter would not be included in the invocation of the procedure. In this case, the missing parameter would result in a PL/SQL error stating that an incorrect number of arguments were passed to the procedure.
In the current BPEL PM release, the missing parameter will be included in the invocation of the procedure. A NULL value will be bound, as shown in the following example:
Even though the element for country was not provided in the instance XML, it still appears in the call to the procedure. In this case, country will be NULL.
Describing DEFAULT Clause Handling in Wrapper Procedures
If a procedure contains a special type requiring a wrapper to be generated, then the default clauses on any of the original parameters will not be carried over to the wrapper, as shown in the following example:
Assuming that the procedure in the preceding example was defined at the top level, outside of a package, then the generated wrapper will appear, as shown in the following example:
In the preceding example, the BOOLEAN type has been replaced by INTEGER. The default clause on the value parameter is missing. In the current release, parameters of generated wrapper procedures will never have a default clause, even if these parameters did in the original procedure. If the element is missing in the instance XML, instead of defaulting to 0, then the value of the parameter will be NULL, as shown in the following example:
To fix this, you can edit the generated SQL file, restoring the default clauses. You should then, run the SQL file to reload the wrapper definitions into the database schema. In addition, you should modify the generated XSD.Following are the steps to fix the default clause with the wrapper generated for needsWrapper():
Change the signature in the following manner in the generated wrapper SQL file, from
TOPLEVEL$NEEDSWRAPPER (isTrue INTEGER, value NUMBER)toTOPLEVEL$NEEDSWRAPPER (isTrue INTEGER, value NUMBER DEFAULT 0)Reload the modified wrapper SQL file mentioned in the preceding example into the appropriate database schema. For BOOLEAN parameters with DEFAULT clause, you need to map as follows:
For example, if the base stored procedure is
PROCEDURE needsWrapper(isTrue BOOLEAN TRUE, value NUMBER DEFAULT 0), then the generated wrapper would be,TOPLEVEL$NEEDSWRAPPER (isTrue INTEGER, value NUMBER). You should manually fix the store procedure to be,TOPLEVEL$NEEDSWRAPPER (isTrue INTEGER DEFAULT 1, value NUMBER DEFAULT 0)If a parameter has a default clause, then its corresponding element in the XSD must have an extra attribute,
db:default='true'. For example, if a parameter has a default clause,TOPLEVEL$NEEDSWRAPPER(isTrue INTEGER DEFAULT 1, value NUMBER DEFAULT 0), then the elements in the XSD forisTrueandvalueneed to have the following new attributes:
Configuring the Invoke Activity
To configure the Invoke activity:
Drag Invoke from the Component palette and drop it at the location where you want to insert the invoke activity in your BPEL process, as shown in Figure 3-14.
Figure 3-14 Dragging the Invoke Activity
Description of 'Figure 3-14 Dragging the Invoke Activity'Double-click Invoke in the process map to open the Invoke dialog box. The General tab is selected by default. Figure 3-15 shows the Invoke dialog box.
Figure 3-15 Configuring the Invoke Activity
Description of 'Figure 3-15 Configuring the Invoke Activity'In the Partner Link box, select the partner link to invoke. This is the partner link that you configured in the previous section. The Operation is automatically selected.
Click the Create icon next to the Input Variable field. Enter a descriptive name for the variable in the Create Variable dialog box that appears. You can also accept the default name. Click OK. Figure 3-16 shows the Create Variable dialog box.
Figure 3-16 Creating a Variable
Description of 'Figure 3-16 Creating a Variable'Click the Create icon next to the Output Variable field. Enter a descriptive name for the variable in the Create Variable dialog box that appears. You can also accept the default name. Click OK.
In the Invoke dialog box, click Apply, and then click OK. The invoke activity is configured.
Configuring the Transform Activity
The Transform activity can be used to configure the parameters for the input and output variables. The Transform activity can also be used if variable values need to be transformed before updating them in Oracle Applications.
The following steps discuss configuring the Transform activity:
Drag and drop Transform into the process map window. The Transform activity should be placed in between Receive and Invoke. Figure 3-17 shows the process map window after the Transform activity has been added.
Figure 3-17 Adding the Transform Activity
Description of 'Figure 3-17 Adding the Transform Activity'Double-click Transform in the process map to open the Transform dialog box. The Transformation tab is selected by default. Figure 3-18 shows the Transform dialog box.
Figure 3-18 Configuring the Transform Activity
Description of 'Figure 3-18 Configuring the Transform Activity'Select the Source Variable and Target Variable from the respective boxes. Elements are mapped from the Source Variable to the Target Variable.
Select the Source Part of the variable from which to map elements. For example, the source part may be a payload schema consisting of a purchase order request.
Select the Target Part of the variable to which to map elements. For example, the target part may be a payload schema consisting of a purchase order acknowledgment.
Click the Create icon next to the Mapper File field to create a new transformation mapping file. Mapper File specifies the file in which you create the mappings using the XSLT Mapper Transformation tool.
The transformation mapping file is displayed. The Design view is displayed by default.
You can define the parameter values in the Design view. Drag a string function to the Design area. Connect the function to the appropriate parameter for which you want to define a value.
Note:
You can use an input parameter value from the source variable, transform it using a string function, and use it as the input parameter value for the target variable.Repeat steps 8 and 9 for all the parameters that you need to supply.
Run-Time Steps
After designing the BPEL process, the next step is to deploy, run and monitor it. This section discusses the following:
Deploying the BPEL Process
You must deploy the BPEL process before you can run it. The BPEL process is first compiled, and then deployed to the BPEL server. The following steps discuss deploying the BPEL process to a BPEL server:
Select the BPEL project in the Applications window.
Right-click the project name, and then select Deploy from the menu that appears.
Select Local BPEL Server followed by Deploy to Default Domain, if you are deploying the process on the local BPEL server. Figure 3-20 illustrates deploying a BPEL process to a local BPEL server.
Figure 3-20 Deploying the BPEL Process
Description of 'Figure 3-20 Deploying the BPEL Process'The Password Prompt dialog box appears. Enter the password for the default domain in the Domain Password field, and then click OK. Figure 3-21 shows the Password Prompt dialog box.
Figure 3-21 Specifying the Domain Password
Description of 'Figure 3-21 Specifying the Domain Password'The BPEL process is compiled and deployed. You can check the progress in the Messages window. Figure 3-22 shows the Messages window.
Figure 3-22 Messages Window
Description of 'Figure 3-22 Messages Window'
Testing the BPEL Process
Once the BPEL process is deployed, it can be seen in the BPEL console. You can manage and monitor the process from the BPEL console. You can also test the process and the integration interface by manually initiating the process. The following steps discuss manually initiating and monitoring the BPEL process:
To open the BPEL console, click Start, and then choose Programs. In the Programs menu, select Oracle - ORACLE_HOME, Oracle BPEL Process Manager 10.1.2, and then select BPEL Console.
The BPEL console login screen is displayed, as shown in Figure 3-23.
Figure 3-23 BPEL Console Login Screen
Description of 'Figure 3-23 BPEL Console Login Screen'Select Default in the Domain box. Enter the password for the default domain in the Password field, and then click Login.
Oracle BPEL console is displayed.
A list of deployed processes is shown under Deployed BPEL Processes. Figure 3-24 shows the BPEL console screen.
Figure 3-24 Deployed BPEL Processes
Description of 'Figure 3-24 Deployed BPEL Processes'Click the BPEL process that you want to initiate. The Initiate page is displayed. Enter the input string required by the process.
Click Post XML Message to initiate the process.
The BPEL process is now initiated. You can check the process flow by clicking the Visual Flow icon. shows the BPEL Console Initiate page.
Figure 3-25 BPEL Console Initiate Page
Description of 'Figure 3-25 BPEL Console Initiate Page'Note:
To confirm that the records have been written into the Oracle Applications, you can write SQLSELECTstatements and fetch the results showing the latest records inserted into Oracle Applications. Alternatively, you can go to the specific module in Oracle Applications and verify the appropriate changes in the records.
Use the Microsoft Intune App Wrapping Tool for Android to change the behavior of your in-house Android apps by restricting features of the app without changing the code of the app itself.
The tool is a Windows command-line application that runs in PowerShell and creates a wrapper around your Android app. After the app is wrapped, you can change the app's functionality by configuring mobile application management policies in Intune.
Before running the tool, review Security considerations for running the App Wrapping Tool. To download the tool, go to the Microsoft Intune App Wrapping Tool for Android on GitHub.
Fulfill the prerequisites for using the App Wrapping Tool
You must run the App Wrapping Tool on a Windows computer running Windows 7 or later.
Your input app must be a valid Android application package with the file extension .apk and:
- It cannot be encrypted.
- It must not have previously been wrapped by the Intune App Wrapping Tool.
- It must be written for Android 4.0 or later.
The app must be developed by or for your company. You cannot use this tool on apps downloaded from the Google Play Store.
To run the App Wrapping Tool, you must install the latest version of the Java Runtime Environment and then ensure that the Java path variable has been set to C:ProgramDataOracleJavajavapath in your Windows environment variables. For more help, see the Java documentation.
Note
In some cases, the 32-bit version of Java may result in memory issues. It's a good idea to install the 64-bit version.
Android requires all app packages (.apk) to be signed. For reusing existing certificates and overall signing certificate guidance, see Reusing signing certificates and wrapping apps. The Java executable keytool.exe is used to generate new credentials needed to sign the wrapped output app. Any passwords that are set must be secure, but make a note of them because they're needed to run the App Wrapping Tool.
Note
The Intune App Wrapping Tool does not support Google's v2 and upcoming v3 signature schemes for app signing. After you have wrapped the .apk file using the Intune App Wrapping Tool, the recommendation is to use Google's provided Apksigner tool. This will ensure that once your app gets to end user devices, it can be launched properly by Android standards.
(Optional) Sometimes an app may hit the Dalvik Executable (DEX) size limit due to the Intune MAM SDK classes that are added during wrapping. DEX files are a part of the compilation of an Android app. The Intune App Wrapping Tool automatically handles DEX file overflow during wrapping for apps with a min API level of 21 or higher (as of v. 1.0.2501.1). For apps with a min API level of < 21, best practice would be to increase the min API level using the wrapper's
-UseMinAPILevelForNativeMultiDexflag. For customers unable to increase the app's minimum API level, the following DEX overflow workarounds are available. In certain organizations, this may require working with whoever compiles the app (ie. the app build team):- Use ProGuard to eliminate unused class references from the app's primary DEX file.
- For customers using v3.1.0 or higher of the Android Gradle plugin, disable the D8 dexer.
Install the App Wrapping Tool
From the GitHub repository, download the installation file InstallAWT.exe for the Intune App Wrapping Tool for Android to a Windows computer. Open the installation file.
Accept the license agreement, then finish the installation.
Note the folder to which you installed the tool. The default location is: C:Program Files (x86)Microsoft Intune Mobile Application ManagementAndroidApp Wrapping Tool.
Run the App Wrapping Tool
On the Windows computer where you installed the App Wrapping Tool, open a PowerShell window.
From the folder where you installed the tool, import the App Wrapping Tool PowerShell module:
Run the tool by using the invoke-AppWrappingTool command, which has the following usage syntax:
The following table details the properties of the invoke-AppWrappingTool command:
| Property | Information | Example |
|---|---|---|
| -InputPath<String> | Path of the source Android app (.apk). | |
| -OutputPath<String> | Path to the output Android app. If this is the same directory path as InputPath, the packaging will fail. | |
| -KeyStorePath<String> | Path to the keystore file that has the public/private key pair for signing. | By default, keystore files are stored in 'C:Program Files (x86)JavajreX.X.X_XXbin.' |
| -KeyStorePassword<SecureString> | Password used to decrypt the keystore. Android requires all application packages (.apk) to be signed. Use Java keytool to generate the KeyStorePassword. Read more about Java KeyStore here. | |
| -KeyAlias<String> | Name of the key to be used for signing. | |
| -KeyPassword<SecureString> | Password used to decrypt the private key that will be used for signing. | |
| -SigAlg<SecureString> | (Optional) The name of the signature algorithm to be used for signing. The algorithm must be compatible with the private key. | Examples: SHA256withRSA, SHA1withRSA |
| -UseMinAPILevelForNativeMultiDex | (Optional) Use this flag to increase the source Android app's minimum API level to 21. This flag will prompt for confirmation as it will limit who may install this app. Users can skip the confirmation dialog by appending the parameter '-Confirm:$false' to their PowerShell command. The flag should only be used by customers on apps with min API < 21 that fail to wrap successfully due to DEX overflow errors. | |
| <CommonParameters> | (Optional) The command supports common PowerShell parameters like verbose and debug. |
For a list of common parameters, see the Microsoft Script Center.
To see detailed usage information for the tool, enter the command:
Example:
Import the PowerShell module.
Run the App Wrapping Tool on the native app HelloWorld.apk.
You will then be prompted for KeyStorePassword and KeyPassword. Enter the credentials you used to create the key store file.
The wrapped app and a log file are generated and saved in the output path you specified. Warhammer 40000 dawn of war dark crusade free download full version.
How often should I rewrap my Android application with the Intune App Wrapping Tool?
The main scenarios in which you would need to rewrap your applications are as follows:
- The application itself has released a new version. The previous version of the app was wrapped and uploaded to the Intune console.
- The Intune App Wrapping Tool for Android has released a new version that enables key bug fixes, or new, specific Intune application protection policy features. This happens every 6-8 weeks through GitHub repo for the Microsoft Intune App Wrapping Tool for Android.
Some best practices for rewrapping include:
- Maintaining signing certificates used during the build process, see Reusing signing certificates and wrapping apps
Reusing signing certificates and wrapping apps
Android requires that all apps must be signed by a valid certificate in order to be installed on Android devices.
Wrapped apps can be signed either as part of the wrapping process or after wrapping using your existing signing tools (any signing information in the app before wrapping is discarded). If possible, the signing information that was already used during the build process should be used during wrapping. In certain organizations, this may require working with whoever owns the keystore information (ie. the app build team).
If the previous signing certificate cannot be used, or the app has not been deployed before, you may create a new signing certificate by following the instructions in the Android Developer Guide.
If the app has been deployed previously with a different signing certificate, the app can't be uploaded to Intune after upgrade. App upgrade scenarios will be broken if your app is signed with a different certificate than the one the app is built with. As such, any new signing certificates should be maintained for app upgrades.
Security considerations for running the App Wrapping Tool
To prevent potential spoofing, information disclosure, and elevation of privilege attacks:
Ensure that the input line-of-business (LOB) application, output application, and Java KeyStore are on the same Windows computer where the App Wrapping Tool is running.
Import the output application to Intune on the same machine where the tool is running. See keytool for more about the Java keytool.
If the output application and the tool are on a Universal Naming Convention (UNC) path and you are not running the tool and input files on the same computer, set up the environment to be secure by using Internet Protocol Security (IPsec) or Server Message Block (SMB) signing.
Ensure that the application is coming from a trusted source.
Secure the output directory that has the wrapped app. Consider using a user-level directory for the output.